Setting Up Git
The very first step for creating our game is setting up a project folder. As we’re going to be using Git to track our changes (and ultimately share our finished game with the world) we’ll setup Git right away.
Creating a new Git Repository
Git calls the folder which contains all of your project files a repository. Git is a ‘Distributed Version Control System’, which means that every user who has a copy of the project actually has a complete local copy of all of the files and every change ever made to their files. If you choose to setup your project on GitHub, you can ‘commit’ lots of sets of changes to your project locally and then “push” a copy of your whole project to GitHub at the end of the day.
We will use GitHub Desktop to create a repository on our computer to start with. Note. This won’t be uploaded to GitHub until we decide to share our repository with the world. For now, it’s just stored on your local computer.
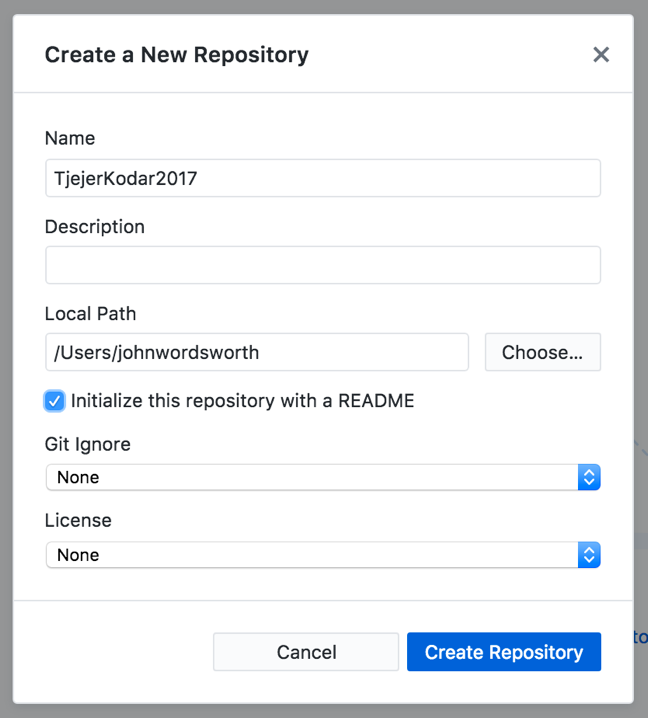
The following steps take you through setting up a new Project in Git.
- Launch GitHub Desktop.
- Go to “File” -> “New Repository…”.
- Give your repository a name, something like “space-avengers”.
- Check the box “Initialize this repository with a README”.
- Select a directory where your project will live.
- Click “Create Repository”
This will create an empty directory on your computer where you can start working on your project. The directory actually contains a hidden ‘.git’ directory which contains all of the internal data that Git needs to work with.
Adding a README
Let’s get started by adding some text to our README and saving that in Git. It’s typical for Git projects to have a plain text file in the project folder called README. GitHub will then show the contents of this file on the website for people browsing to the project. This file is a text file with special codes for adding simple formatting called a ‘Markdown’ file. We don’t need to do anything special yet though, so just go through the following steps to add some text to our README.
- If you forgot to create this file when creating your repository, create an empty text file in the project directory called “README”.
- Open the README text file in a basic text editor (such as Notepad or TextEdit).
- Enter the following text in the file and save it.
## Space Avengers

My Tjejer Kodar 2017 project!
Commiting Changes
Now that you have edited your README file, you are ready to commit your changes to the project and have them stored forever.
- If you open GitHub Desktop agian, you should see that the README file is new or changed in the left hand panel under ‘Changes’. Here you can click on all of the files that have changed since your last commit and see what’s changed.
- When you’re happy with your changes, enter a short message describing what you did in this set of changes. Something like “Initial Readme Text” is fine.
- Click the ‘Commit to develop’ button at the bottom of the screen.
Browsing History
By clicking on the ‘History’ tab at the top of the screen you can see all of the changes that have happened in your project. Clicking on any of the commit messages you’ve left will show you a list of all of the files that changed in that commit and what those changes were.
If you think you’ve made a mistake at any point during your project, it’s also possible to right click on any change in the project history and click ‘Revert This Commit’. That will undo all of the changes that were done in that commit, even if you have done other changes afterwards. While it’s sometimes possible that this breaks files (if you have made lots of changes to your files since a commit), you never have to worry - because you’ll also have to ‘commit’ the changes that you made by reverting the previous commit. So if it does mess something up - you can go all inception and ‘revert the revert commit’.